Dear Readers: HWS has recently started a new project for the students of engineering ====> The Engineering Projects


Write at HWS !!!

Guest Posting

How secure is your Computer ?

Check out your computer safety here . A lot of tools , tricks and hacks related to computer .

Blogger Tips and Tricks

A Lot of tips ,tricks and hacks related to blogger . Seo tricks to get maximum targetted traffic to your blog.

Easy ways to Earn Online

Online earning is not so difficult but it needs a lot of patience and hardwork. Here are some techniques to earn money through internet.

Facebook Tricks

A lot of facebook tips , tricks and hacks.It requires a lot of time but reading is must.

Pro Hacking

If you have knowledge about basic techniques then try this,but be careful as it is highly toxic.

Tuesday, April 26, 2011

Multi Tab Widget For Blogger/Blogspot Blogs -Updated

Update: A more cuter and improved widget can be found here -> Advanced Multi Tabbed Widget
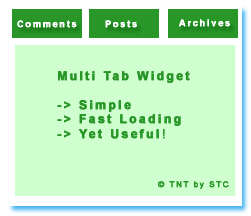
multi-tab-widget-for-blogge
Multi tab Widget is a must widget for every blog may that be wordpress hosted blog or Blogspot/Blogger. It helps to decrease the load time of a blog by combining three or more than three widgets into one! .You might have seen this widget on every blog and even on my blog (look at the sidebar) but the question is how do you add it? Well If you go and search in Google on how to add a multi tab widget to your blog you will land on various blogs with several tutorials but believe it or not, disappointment is what you will get in return. Now why is that?


This widget looks cool only if coded with CSS and JavaScript. Several blogs share different tutorials but unfortunately most of these tutorials are either very difficult to understand or they are written in a technical language that a newbie can’t understand. Moreover the codes that they offer are pretty lengthy which increase the load time of your homepage and often the widget doesn’t seem to work in browsers like Internet Explorer. And the worst part is that some bloggers who share this trick often add their blog link to the widget code and when you view that widget in your blog, at the bottom of that widget you will find this “ Widget by XYZ.com” or “Grab This Widget”. This link is surely injustice with the reader. In short give preference to anything which is easy to understand, interesting and which may give a professional look to your blog not a Grab this widget look.
Now how come my widget be very different. As I have mentioned in my About Me page that I am not an HTML or JavaScript expert but I have learnt the art of editing my template through trial and error. I read blogs day and night and when some blog catch my attention I start playing with its template via its Source File, which shows all their template coding in HTML, XML and CSS Language. Hence I have stolen many hidden and secret codes :D and thus I am ready to share those codes with you. Don’t worry I will never add a Grab this widget link to any widget that I share.

UPDATE

Most of you complained that the tabs are not working/clickable. I was amazed too because this widget was working perfectly alright in all my test blogs. Then how come its not working in your blogs? Well the answer was simple than I could imagine.
This widget uses a JavaScript which is responsible for making the tabs clickable. I saved this widget in Google sites and link it to this widget. This was the mistake that I commit. Google sites offers limited bandwidth and is far slow to respond than you can imagine. Hence when you guys would add this widget to your blog, the JavaScript would not load, as a result leading to static tabs.
Fortunately I have updated this post with all necessary steps to take. You will have to add the JavaScript directly to your blogger templates. Doing this will improve the widget performance and will also reduce your page load time. This update will solve all your problems!

Steps to Folow

  • Go To Blogger > Layout > Edit HTML
  • Search for

    </head>
  • And Just above paste the code below,
/*----- www.hackwithstyle.com Multitab Widget Code starts here----- */
<script type='text/javascript'>

//<![CDATA[

function tabtampil_oomundefinedTPID, id)
{
var Tabtampil = document.getElementByIdundefinedTPID);
var TTs = Tabtampil.firstChild;
while undefinedTTs.className != "TTs" ) TTs = TTs.nextSibling;
var TT = TTs.firstChild;
var i = 0;
do
{
if undefinedTT.tagName == "A")
{
i++;
TT.href = "javascript:tabtampil_ubahundefined'"+TPID+"', "+i+");";
TT.className = undefinedi == id) ? "Active" : "";
TT.blurundefined);
}
}
while undefinedTT = TT.nextSibling);
var Halamans = Tabtampil.firstChild;
while undefinedHalamans.className != 'Halamans') Halamans = Halamans.nextSibling;
var Halaman = Halamans.firstChild;
var i = 0;
do
{
if undefinedHalaman.className == 'Halaman')
{
i++;
if undefinedHalamans.offsetHeight) Halaman.style.height = undefinedHalamans.offsetHeight-2)+"px";
Halaman.style.overflow = "auto";
Halaman.style.display = undefinedi == id) ? 'block' : 'none';
}
}
while undefinedHalaman = Halaman.nextSibling);
}
function tabtampil_ubahundefinedTPID, id) { tabtampil_oomundefinedTPID, id);
}
function tabtampil_inisialundefinedTPID) { tabtampil_oomundefinedTPID, 1);
document.writeundefined'');}

//]]>

</script>
/*----- www.hackwithstyle.com Multitab Widget Code ends here----- */
  • Save your template 
  • Now Adding the code for Multi Tab widget to HTML/JavaScript widget. 
  • The Code for Our Multi Tab Widget looks like this,
/*----- www.hackwithstyle.com Multitab Widget Code starts here----- */
<style type="text/css">
div.TabTampil div.TTs
{height: 24px; overflow: hidden; }
div.TabTampil div.TTs a:hover, div.TabTampil div.TTs a.Active
{ background-color: #eee; }
div.TabTampil div.Halamans
{ clear: both; border: 1px solid #fff; overflow: hidden; background-color: #ffffff;}
div.TabTampil div.Halamans div.Halaman
{ height: 100%; padding: 0px; overflow: hidden; }
div.TabTampil div.Halamans div.Halaman div.Alas
{ padding: 3px 5px; }
div.TabTampil div.TTs a
{ border-left:1px solid #eee; border-right:1px solid #eee; border-top:1px solid #eee; border-bottom:0px solid #eee; float: left;
display: block; width: 95px; text-align: center; vertical-align: middle; height: 24px; padding-top: 3px; text-decoration: none; font-family: "Arial", Serif;
font-size: 11px; font-weight: 900; color: #000000}
</style>
<form action="tabtampil.html" method="get">
<div id="TabTampil" class="TabTampil">
<div style="width: 300px;" class="TTs"> <a>Tab 1</a> <a>Tab 2</a> <a>Tab 3</a></div>
<div style="width: 300px; height: 300px;" class="Halamans">
<div class="Halaman">
<div class="Alas">
<br/>

Tab 1 content goes here

</div>
</div>
<div class="Halaman">
<div class="Alas">
<br/>

Tab 2 content goes here

</div>
</div>
<div class="Halaman">
<div class="Alas">
<br/>

Tab 3 content goes here

</div>
</div>
</div>
</div>
</div></form>
<script type="text/javascript">tabtampil_inisialundefined'TabTampil');</script>

/*----- www.hackwithstyle.com Multitab Widget Code starts here----- */

Things To Note

#eee : This is the background colour of the Tabs. The Default one is grey. If you want to change it to a different colour of your choice then use Embeddable Colour Chart
#fff : This is the colour of the border of your multi tab widget. The default one is white you can customize it to a colour of your choice using the same colour chart mentioned above.
#ffffff : This is the background colour of the main body of your widget. This is where you will add content to the widget. The default one is white. Use Colour Chart if you wish to use a different colour.
#eee : This is the colour of the borders around those rectangular tabs. The default one is grey. Use Colour Chart if you wish to use a different colour.
#000000 : This is the colour of the text/font that you will write to name your tabs. In other words, it’s the colour of your tab titles. The default one is black.
  • Replace these with your tab titles Tab 1 , Tab 2 , Tab 3 
  • Replace these with your widget codes Tab 1 content goes here , Tab 2 content goes here , Tab 3 content goes here .
Here goes the codes of your content/widgets, which can be your recent comments widget, recent posts widget, any written text, a picture etc. For example, to add a recent comments widget to the first tab, name Tab 1 as Comments and replace Tab 1 content goes here with the HTML code of your recent comments widget.

Adding the Multi Tab Widget To your Blog

After you have customized the code, do the following,
  • Log into your blogger account
  • Go to Layout > Page Elements
Blogger Layout Page Elements
  • Click on Add a Gadget
add-a-gadget
  • Then Choose HTML/JavaScript Widget from the widget list that blogger provides
htmljavascript widget blogger

Now paste your customized code into this widget by leaving the title empty. Hit Save and You are Done! Check your blog to see the new dress :)

That’s All!

Feel free to ask or suggest. Your questions and suggestions are the only favour I get in return.

Advanced Multi Tabbed Widget For Blogger – Fully Widgetized!

I had published a post on how to add a multi tab widget to your blogger blogs and how to customize it to suit your blog layout some months ago. The only problem with that widget is that it is not fully widgetized i.e you can not add archives, labels, author profile or other blogger official widgets to it unless you have their separate code with you. I just came across a beautiful and a more flexible and advanced tabber widget stylized by Lawny Designs and scripted by Barelyfitz. I have modified lawny’s tutorial and have made some changes to the code so to make it even more simpler to newbie bloggers. You can view this widget hanging on my sidebar.


To add this cute multi tab widget to your BlogSpot blogs follow these steps :

Steps to Follow

  • Step 1
Go to Blogger > Layout > Edit HTML
  • Step 2
Search For

</head>
  • Step 3
Paste the code below just above it :

<---- www.hackwithstyle.com Multi Tab code starts here ----->
<script type='text/javascript'>
//<![CDATA[
document.writeundefined'<style type="text/css">.tabber{display:none;}<\/style>');
function tabberObjundefinedargsObj)
{
var arg;
this.div = null;
this.classMain = "tabber";
this.classMainLive = "tabberlive";
this.classTab = "tabbertab";
this.classTabDefault = "tabbertabdefault";
this.classNav = "tabbernav";
this.classTabHide = "tabbertabhide";
this.classNavActive = "tabberactive";
this.titleElements = ['h2','h3','h4','h5','h6'];
this.titleElementsStripHTML = true;
this.removeTitle = true;
this.addLinkId = false;
this.linkIdFormat = '<tabberid>nav<tabnumberone>';
for undefinedarg in argsObj) { this[arg] = argsObj[arg]; }
this.REclassMain = new RegExpundefined'\\b' + this.classMain + '\\b', 'gi');
this.REclassMainLive = new RegExpundefined'\\b' + this.classMainLive + '\\b', 'gi');
this.REclassTab = new RegExpundefined'\\b' + this.classTab + '\\b', 'gi');
this.REclassTabDefault = new RegExpundefined'\\b' + this.classTabDefault + '\\b', 'gi');
this.REclassTabHide = new RegExpundefined'\\b' + this.classTabHide + '\\b', 'gi');
this.tabs = new Arrayundefined);
if undefinedthis.div) {
this.initundefinedthis.div);
this.div = null;
}
}


tabberObj.prototype.init = functionundefinede)
{


var
childNodes,
i, i2,
t,
defaultTab=0,
DOM_ul,
DOM_li,
DOM_a,
aId,
headingElement;
if undefined!document.getElementsByTagName) { return false; }
if undefinede.id) {
this.id = e.id;
}
this.tabs.length = 0;
childNodes = e.childNodes;
forundefinedi=0; i < childNodes.length; i++) {
ifundefinedchildNodes[i].className &&
childNodes[i].className.matchundefinedthis.REclassTab)) {
t = new Objectundefined);
t.div = childNodes[i];
this.tabs[this.tabs.length] = t;


if undefinedchildNodes[i].className.matchundefinedthis.REclassTabDefault)) {
defaultTab = this.tabs.length-1;
}
}
}
DOM_ul = document.createElementundefined"ul");
DOM_ul.className = this.classNav;
for undefinedi=0; i < this.tabs.length; i++) {


t = this.tabs[i];


t.headingText = t.div.title;


if undefinedthis.removeTitle) { t.div.title = ''; }


if undefined!t.headingText) {


for undefinedi2=0; i2<this.titleElements.length; i2++) {
headingElement = t.div.getElementsByTagNameundefinedthis.titleElements[i2])[0];
if undefinedheadingElement) {
t.headingText = headingElement.innerHTML;
if undefinedthis.titleElementsStripHTML) {
t.headingText.replaceundefined/<br>/gi," ");
t.headingText = t.headingText.replaceundefined/<[^>]+>/g,"");
}
break;
}
}
}


if undefined!t.headingText) {
t.headingText = i + 1;
}


DOM_li = document.createElementundefined"li");


t.li = DOM_li;


DOM_a = document.createElementundefined"a");
DOM_a.appendChildundefineddocument.createTextNodeundefinedt.headingText));
DOM_a.href = "javascript:voidundefinednull);";
DOM_a.title = t.headingText;
DOM_a.onclick = this.navClick;


DOM_a.tabber = this;
DOM_a.tabberIndex = i;


if undefinedthis.addLinkId && this.linkIdFormat) {


aId = this.linkIdFormat;
aId = aId.replaceundefined/<tabberid>/gi, this.id);
aId = aId.replaceundefined/<tabnumberzero>/gi, i);
aId = aId.replaceundefined/<tabnumberone>/gi, i+1);
aId = aId.replaceundefined/<tabtitle>/gi, t.headingText.replaceundefined/[^a-zA-Z0-9\-]/gi, ''));


DOM_a.id = aId;
}


DOM_li.appendChildundefinedDOM_a);


DOM_ul.appendChildundefinedDOM_li);
}


e.insertBeforeundefinedDOM_ul, e.firstChild);


e.className = e.className.replaceundefinedthis.REclassMain, this.classMainLive);


this.tabShowundefineddefaultTab);


if undefinedtypeof this.onLoad == 'function') {
this.onLoadundefined{tabber:this});
}


return this;
};


tabberObj.prototype.navClick = functionundefinedevent)
{


var
rVal,
a,
self,
tabberIndex,
onClickArgs;


a = this;
if undefined!a.tabber) { return false; }


self = a.tabber;
tabberIndex = a.tabberIndex;


a.blurundefined);


if undefinedtypeof self.onClick == 'function') {


onClickArgs = {'tabber':self, 'index':tabberIndex, 'event':event};


/* IE uses a different way to access the event object */
if undefined!event) { onClickArgs.event = window.event; }


rVal = self.onClickundefinedonClickArgs);
if undefinedrVal === false) { return false; }
}


self.tabShowundefinedtabberIndex);


return false;
};


tabberObj.prototype.tabHideAll = functionundefined)
{
var i;


for undefinedi = 0; i < this.tabs.length; i++) {
this.tabHideundefinedi);
}
};


tabberObj.prototype.tabHide = functionundefinedtabberIndex)
{
var div;


if undefined!this.tabs[tabberIndex]) { return false; }


div = this.tabs[tabberIndex].div;


if undefined!div.className.matchundefinedthis.REclassTabHide)) {
div.className += ' ' + this.classTabHide;
}
this.navClearActiveundefinedtabberIndex);


return this;
};


tabberObj.prototype.tabShow = functionundefinedtabberIndex)
{


var div;


if undefined!this.tabs[tabberIndex]) { return false; }


this.tabHideAllundefined);


div = this.tabs[tabberIndex].div;


div.className = div.className.replaceundefinedthis.REclassTabHide, '');


this.navSetActiveundefinedtabberIndex);


if undefinedtypeof this.onTabDisplay == 'function') {
this.onTabDisplayundefined{'tabber':this, 'index':tabberIndex});
}


return this;
};


tabberObj.prototype.navSetActive = functionundefinedtabberIndex)
{


this.tabs[tabberIndex].li.className = this.classNavActive;


return this;
};


tabberObj.prototype.navClearActive = functionundefinedtabberIndex)
{


this.tabs[tabberIndex].li.className = '';


return this;
};


function tabberAutomaticundefinedtabberArgs)
{
var
tempObj,
divs,
i;


if undefined!tabberArgs) { tabberArgs = {}; }


tempObj = new tabberObjundefinedtabberArgs);


divs = document.getElementsByTagNameundefined"div");
for undefinedi=0; i < divs.length; i++) {
if undefineddivs[i].className &&
divs[i].className.matchundefinedtempObj.REclassMain)) {
tabberArgs.div = divs[i];
divs[i].tabber = new tabberObjundefinedtabberArgs);
}
}
return this;
}
function tabberAutomaticOnLoadundefinedtabberArgs)
{
var oldOnLoad;


if undefined!tabberArgs) { tabberArgs = {}; }


oldOnLoad = window.onload;
if undefinedtypeof window.onload != 'function') {
window.onload = functionundefined) {
tabberAutomaticundefinedtabberArgs);
};
} else {
window.onload = functionundefined) {
oldOnLoadundefined);
tabberAutomaticundefinedtabberArgs);
};
}
}


/* Run tabberAutomaticOnloadundefined) unless the "manualStartup" option was specified */


if undefinedtypeof tabberOptions == 'undefined') {


tabberAutomaticOnLoadundefined);


} else {


if undefined!tabberOptions['manualStartup']) {
tabberAutomaticOnLoadundefinedtabberOptions);
}


}


//]]>
</script>
<---- www.hackwithstyle.com Multi Tab code starts here ----->
  • Step 4
Now search for

]]></b:skin>

and just above it paste this code,

/*---------- Tabber Start-------- */


.tabberlive{
margin:0;
padding:5px;
clear:both;
background:$tbbxbgcolor;
border:1px solid $tbbxbrcolor;
}
.tabbernav {
margin:0;
padding: 3px 0;
border-bottom: 1px solid $tbbxbrcolor;
font-family:Arial,Helvetica,sans-serif;
font-size:12px;
font-weight:bold;
}
.tabbernav li {
list-style:none;
margin:0;
display:inline;
}
.tabbernav li a {
padding:3px 0.5em;
margin-right:1px;
border:1px solid $tbbxbrcolor;
border-bottom:none;
background:$tbbxcolor2;
text-decoration:none;
color:$tbbxcolor1;
}
.tabbernav li a:hover {
color:$tbbxcolor2;
background:$tbbxcolor1;
border-color:$tbbxbrcolor;
text-decoration:none;
}
.tabbernav li.tabberactive a,
.tabbernav li.tabberactive a:hover {
background:$tbbxcolor1;
color:$tbbxcolor2;
border-bottom: 1px solid $tbbxcolor1;
}
.tabberlive .tabbertab {
padding:5px;
border:1px solid $tbbxbrcolor;
border-top:0;
background:$tbbxcolor1;
}
.tabberlive .tabbertab h2,
.tabberlive .tabbertabhide {
display:none;
}
.tabbertab .widget-content ul{
list-style:none;
margin:0 0 10px 0;
padding:0;
}
.tabbertab .widget-content li {
border-bottom:1px solid $tbbxbrcolor;
margin:0 5px;
padding:2px 0 5px 0;
}


/*------- Tabber End--------*/

  • Step 5 
Don’t save your template. Now search for Variable definitions and paste this code with other variable definitions,

<Variable name="tbbxbgcolor" description="Tab box Background Color" type="color" default="#f8f8f8" value="#f8f8f8">
<Variable name="tbbxbrcolor" description="Tab box Border Color" type="color" default="#dcdcdc" value="#dcdcdc">
<Variable name="tbbxcolor1" description="Tab box Color 1" type="color" default="#ffffff" value="#ffffff">
<Variable name="tbbxcolor2" description="Tab box Color 2" type="color" default="#5588aa" value="#5588aa">

If you can’t find Variable definitions then search for #navbar-iframe and paste this code below #navbar-iframe
 
/* Variable definitions
====================


<Variable name="tbbxbgcolor" description="Tab box Background Color" type="color" default="#f8f8f8" value="#f8f8f8">
<Variable name="tbbxbrcolor" description="Tab box Border Color" type="color" default="#dcdcdc" value="#dcdcdc">
<Variable name="tbbxcolor1" description="Tab box Color 1" type="color" default="#ffffff" value="#ffffff">
<Variable name="tbbxcolor2" description="Tab box Color 2" type="color" default="#5588aa" value="#5588aa">


*/

  • Step 6
Now the final part. Search for

<div id='sidebar-wrapper'>

and paste this code just below it:

<div style='clear:both;'/>


<div class='tabber'>
<b:section class='tabbertab' id='tab1' maxwidgets='1'/>
<b:section class='tabbertab' id='tab2' maxwidgets='1'/>
<b:section class='tabbertab' id='tab3' maxwidgets='1'/>
<b:section class='tabbertab' id='tab4' maxwidgets='1'/>
</div>
  • Step 7
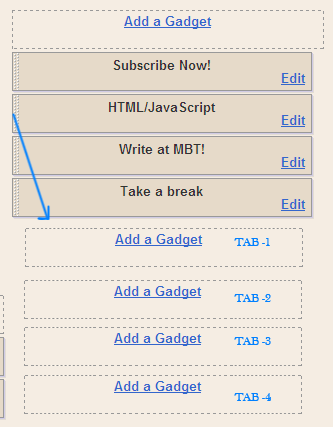
Finally save your template and visit Layout > Page Elements to start adding widgets to the tabs! It will look something like this :

MULTI-TABBED-WIDGET
The widgets are arranged number wise. Starting from Tab-1 and ending at Tab-4. To add a gadget/widget to any tab simply click the link Add a Gadget and start adding whatever you want.
Finally view your template to see it hanging! :)

Customization Guide To Multi Tab Widget

Here we will discuss how to change the Look and position of this multi tabbed widget.

Changing Position :


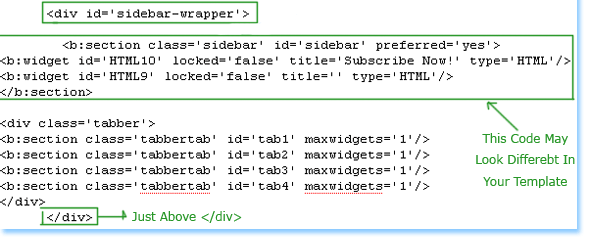
To shift this tabber widget to the bottom section of your sidebar rather at the extreme top, do this,

  • Paste the code in Step#6 just as shown in the image below :
Shift-position-of-tabber

  • Save your template and go to Layout > Page Elements to see if it has shifted to the bottom.
Changing Look and Feel :
  • The background colours of the widget can be changed by editing the code in step#5. I am rewriting the code here with some description.

<Variable name="tbbxbgcolor" description="Tab box Background Color" type="color" default="#f8f8f8" value="#f8f8f8">


<Variable name="tbbxbrcolor" description="Tab box Border Color" type="color" default="#dcdcdc" value="#dcdcdc">


<Variable name="tbbxcolor1" description="Tab box Color 1" type="color" default="#ffffff" value="#ffffff">


<Variable name="tbbxcolor2" description="Tab box Color 2" type="color" default="#289728" value="#289728">

This code has four main sections amongst which the sections tbbxcolor1: and tbbxcolor2: are the most important. I will describe each one in detail.

Important Sections:tbbxcolor1: This is an important section. It defines the background colour of this multi tab widget and also the colour on mouse hover. The default colour is white i.e #ffffff

tbbxcolor2: This refers to the background colour of the tabs and the text inside the tabs. the default colour is green. You can change the value #289728 to a different colour value using our color chart

Change these only if you wish :  

tbbxbgcolor: This section refers to the background colour of the tab box. By default the colour is grey. If you wish to change it to a different colour simply change the hexadecimal colour value #f8f8f8 to something different using our Color Chart

tbbxbrcolor: This refers to the border line color across the tabs and the box.

That’s All!

I hope this widget will help a lot in giving a clean and neat touch to your blogs. Any question is welcomed.

Monday, April 25, 2011

125 by 125 Ad Banner Widget For Blogger/Blogspot Blogs.

Early this morning I tried to create some tables using simple HTML. Remarkably I arrived at a really easy and well optimized code that could be used to show your 125 by 125 Ad banners just like the one shown on the left side picture.Till now we have learn the use of Windows Live Writer and now we are moving towards adding a very cool widgets to our blogger template This widget is named “125 by 125 Ad Banner Widget


Here is the code to be pasted in your HTML/JavaScript Widget :

<---- www.hackwithstyle.com Add Banner code starts here ----->
<div align="center">

<table border="0" cellpadding="2" cellspacing="6" width="265" bgcolor="#ffffff">
<tbody><tr>


<td><center><a href="URL OF ADVERTISER" rel="nofollow"><img border="0" alt="AD DESCRIPTION" width="125" src="URL OF BANNER’S IMAGE" height="125"/></a></center></td>


<td><center><a href="URL OF ADVERTISER" rel="nofollow"><img border="0" alt="AD DESCRIPTION" width="125" src="URL OF BANNER’S IMAGE" height="125"/></a></center></td>
</tr>
<tr>


<td><center><a href="URL OF ADVERTISER" rel="nofollow"><img border="0" alt="AD DESCRIPTION" width="125" src="URL OF BANNER’S IMAGE" height="125"/></a></center></td>


<td><center><a href="URL OF ADVERTISER" rel="nofollow"><img border="0" alt="AD DESCRIPTION" width="125" src="URL OF BANNER’S IMAGE" height="125"/></a></center></td>
</tr>


</tbody></table>


<table border="0" bordercolor="#0084ce" cellpadding="2" cellspacing="6" width="265" bgcolor="#ffffff">
<tbody>
<tr>
<td><center><a href="URL OF ADVERTISER" rel="nofollow"><img width="265" height="37" border="0" alt="Advertise Now!" src="URL OF BANNER’S IMAGE" /></a></center></td>
</tr>
</tbody></table>
</div>
<---- www.hackwithstyle.com Add Banner code ends here ----->
 
Now make the following changes :

1. Replace URL OF ADVERTISER with the website link of the advertiser.

2. Replace URL OF BANNER’S IMAGE with the Image link of the Advertiser’s banner.

 
3. Replace AD DESCRIPTION with some information related to the Ad. The description appears when some hovers his mouse cursor over the banner.
 
4. If you want to increase the distance between the ad blocks then adjust width="265" . By default 265 is the minimum width of this banner widget. You can’t further decrease the width.

  • If you want to increase the number of rows of this ad widget and want to add two other Ad blocks i.e 6 ad blocks. Then simply copy paste the code below just above
<tr>


<td><center><a href="URL OF ADVERTISER" rel="nofollow"><img border="0" alt="AD DESCRIPTION" width="125" src="URL OF BANNER’S IMAGE" height="125"/></a></center></td>


<td><center><a href="URL OF ADVERTISER" rel="nofollow"><img border="0" alt="AD DESCRIPTION" width="125" src="URL OF BANNER’S IMAGE" height="125"/></a></center></td>
</tr>
  • If you want to have a more fancy Ad widget then copy and paste the code below in your HTML/Javascript Widget
<---- www.hackwithstyle.com Add Banner code starts here ----->
<div align="center">
<table border="0" cellpadding="2" cellspacing="6" width="265" bgcolor="#ffffff">
<tbody><tr>


<td><center><a href="URL OF ADVERTISER" rel="nofollow"><img border="0" alt="AD DESCRIPTION" width="125" src="URL OF BANNER’S IMAGE" height="125"/></a></center></td>


<td><center><a href="URL OF ADVERTISER" rel="nofollow"><img border="0" alt="AD DESCRIPTION" width="125" src="URL OF BANNER’S IMAGE" height="125"/></a></center></td>
</tr>
<tr>


<td><center><a href="URL OF ADVERTISER" rel="nofollow"><img border="0" alt="AD DESCRIPTION" width="125" src="URL OF BANNER’S IMAGE" height="125"/></a></center></td>


<td><center><a href="URL OF ADVERTISER" rel="nofollow"><img border="0" alt="AD DESCRIPTION" width="125" src="URL OF BANNER’S IMAGE" height="125"/></a></center></td>
</tr>


</tbody></table>


<table border="0" bordercolor="#0084ce" cellpadding="2" cellspacing="6" width="265" bgcolor="#ffffff">
<tbody>
<tr>
<td><center><a href="URL OF ADVERTISER" rel="nofollow"><img width="265" height="37" border="0" alt="Advertise Now!" src="URL OF BANNER’S IMAGE" /></a></center></td>
</tr>
</tbody></table>
</div>
<---- www.hackwithstyle.com Add Banner code starts here ----->

Follow the same steps as instructed above to customize this new code.

I hope you will surely like this widget. The internet is full of tutorials for such a widget but most of them use complex CSS and ask you to edit your blogger template but this one is using simple HTML and is a copy-paste widget code. Kindly let us know how you find it. 


That’s All!

I hope this widget will help a lot in giving a clean and neat touch to your blogs. Any question is welcomed.

Connect Your Blog to Twitter & Facebook

Follow these Steps carefully :

Step 1

  • Go over to http://www.twitterfeed.com and sign up for a free account and get your free TwitterFeed OpenID. 
  • You will need your Twitter account information Just follow the three steps under the "Get Started" heading. 
  • You will also need your blog’s RSS feed URL. 
  • Once you have set up TwitterFeed, your next step is to log into your Twitter account.

Step 2

  • Log into your Twitter account and click on the "Settings" link.

Step 3

  • Under the "More Info URL" you will see a red link entitled, "You can Add Twitter To Your Site Here." Click on this link.

Step 4

  • Click on the Facebook icon and click on the "Continue" link.

Step 5

  • Click "Install Twitter in Facebook."
  • That’s it! Now, when you post to your blog, it shows up in Twitter. 
  • Once it is in Twitter, it will show up in Facebook.

Friday, April 22, 2011

Create Blogger Backup For Images And Get Image URLs

Backup-Images-in-Blogger
Many bloggers including some professional ones suggest to store Blogger images on services like www.Photobucket.com , www.tinypic.com etc. but I really don’t understand why would someone do that when one has unlimited Image storage and bandwidth inside Picasa web albums that is where Blogger saves all your images. Well its time to change the way people use Blogger and we are here to let you help make better use of resources available to you.

Today I will share a different way of managing all your images in blogger by letting you know how to create a Backup for all your images and we will also learn how to get Unique URLs for images. This tutorial will also help you in reducing your blog load time by 40% i.e 150-200kb
To create an Image Backup you will need to do the following,
  • Go To Blogger
  • Create a draft Post and name it Backup For Images
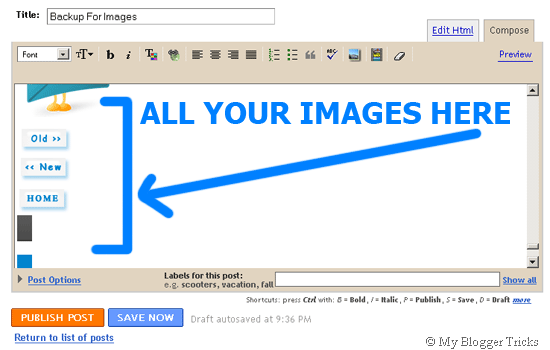
  • Now start uploading all your images to blogger using the normal method. These images can be images that you have saved elsewhere and have link to it in your blogger template. For example: Background Image, Sidebar Headers, Icons, Header Background etc. If you scan your template you will find many image URLs inside the CSS part that starts from and ends at . An image URL/link can end as .gif | .png | .jpeg | .bmp etc. Open each URL/link in your browser and save the image in your Hard Drive by right clicking on it and then choosing “Save Image As”
  • Once you have uploaded all your images, your backup will look like that of mine,
BACKUP FOR IMAGES

  • Now Comes the interesting part. In order to get Image URLs and use them somewhere inside your blog template or sidebar widgets, you will need to do the following,
    • Make sure you are using Firefox Browser
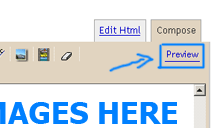
    • Click the Preview Link at the top-right corner of your Backup post
    Preview-link
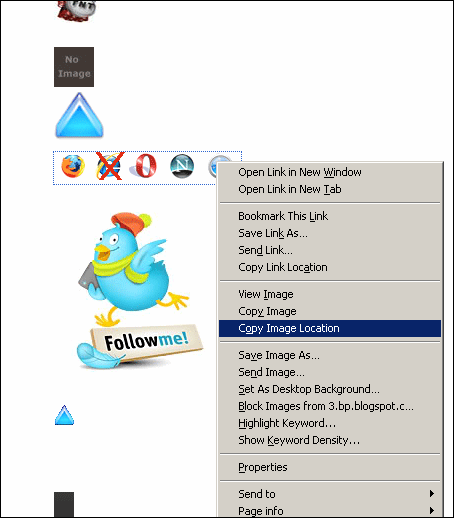
    Copy-Image-Location
    • Once the images are displayed below the draft post, simply right click on your desired image and then choose “Copy Image Location”
    • Now paste this Image URL inside your Browser Address bar,
Paste-Image-URL-in-Browser-
  • Your Image URL will look something like the one below,
http://4.bp.blogspot.com/_7wIwo/Spr1Lxjk6I/AABu0/uS0zY4/s400/MyBloggerTricks.jpg
The important part in this link is s400 . If you want the image to appear in full size then change s400 to s1600 . The image will appear in its original size.
Now this is how I store all my images and get their unique URLs. This way you will never loose images. By adding such image URLs to your blogger templates, you will observe a significant decrease in the load time of your blog.
I will publish a detailed post tomorrow on how to reduce Blog Load time. Make sure you don’t miss it.

That’s All!

I hope this widget will help a lot in giving a clean and neat touch to your blogs. Any question is welcomed.

Thursday, April 21, 2011

Best Adsense Ad Locations & Ad Formats To Earn Handsome Revenue

Almost everyone is well aware that adsense really pays! But most people are still disappointed with their adsense revenue despite working hard in writing good content. I had the same feeling but as time passed I became more and more familiar at how Adsense payment mechanism works. Those who think they are smarter than the Adsense Engineers often end in frustration upon deactivation of their adsense accounts. Kindly prefer fair earning and give preference towards writing good content and attracting more and more readers. The true income lies in the number of visitors to your blog. Clicks, Page Impressions will increase once you make a good start with adsense. By good start I mean choosing smart locations on your layout to encourage Clicks and boost up your daily page Impressions. 

Note:- 1000 Page Impressions can return $0.5-$1. Depends on type of Ad.

While deciding an Ad Position Always Ask your selves these questions:-

  • What is the user trying to accomplish by visiting my site?
  • What do they do when viewing a particular page?
  • Where is their attention likely to be focused?
  • How can I integrate ads into this area without getting in the users' way?
  • How can I keep the page looking clean, uncluttered and inviting?
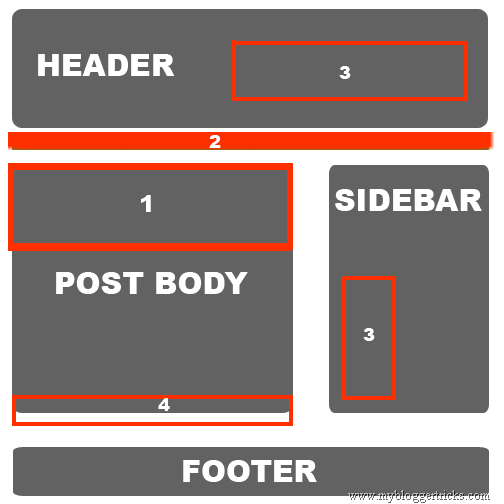
    By experimenting with certain Ad positions on our blog and by studying various adsense articles we can now confidently claim the best Ad spots for Blogspot and Wordpress blogs. Observe carefully our Monetized Sample Blog Layout below:

    Adsense-Best-Ad-Spots

    Every Blog has four main sections i.e
    • The Header:- where we display blog title, description and navigation menu.
    • Post Body:- where we write content
    • Sidebar:- where we display widgets
    • Footer:- where we display credits or widgets
    We have numbered the best Ad Locations from #1 (best) to #4 (Least Best). The reasons for each location are explained below.

    Location # 1 : Addsense Below Post Titles

    • This is the best position to display your ads. We have observed that our blog earning increased tremendously when we decided to display ads below post titles. In fact this is the only spot which is first sight of attraction for every reader. 
    • You can observe that I have displayed no ads below post titles on my homepage but when you enter a specific page the Ad below post title appears.This way we keep our layout clean and revenue green :) I will write a detailed post tomorrow on how to add adsense code below post titles, below post body and under navigation menu.
    • The Ad formats below will return really impressive results for Ads displayed below post titles
    Best Ad Formats:-
    • Banner (468 x 60) Or
    • Square (250 x 250)  Or
    • Medium Rectangle (300 x 250)

    Location #2:- Addsense Above Navigation Menu

    • Now this location is the second best position which is the favourite Ad spot choice for many professional bloggers. The reasons are simple. Firstly because this area is of greatest interest to visitors and secondly because Ads in this area look clean and uncluttered so it won’t annoy the readers at all!
    • This area will have the highest page Impressions because it appears every where from homepage to archives and individual post pages!
    Best Ad Formats:-
    • (728x15) Displays up to 5 links   OR
    • (728x15_4) Displays up to 4 links

    Location #3:- Addsense in Header/Sidebars

    header-right

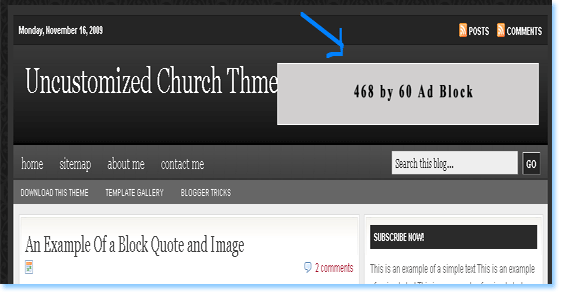
    These two locations have their own importance and according to our experiments we have obtained equal results from both these areas. These two areas give the highest page impressions. Again for the same reason that they appear everywhere, may that be your homepage, archive pages or post pages.

    adsense skyscraper

    Displaying a skyscraper at the sidebar can result in tremendous clicks. A skyscraper if customized well enough can appear just like a part of your blog links. The ads appearing in skyscraper are very tempting, interesting and attractive at the same time. A well displayed and clean skyscraper  will always attract a visitor to find the right answer to his query.

    Best Ad Formats:-
    • For Header Right Choose Banner (468 x 60)
    • For Sidebar choose Skyscraper (120x600) or Wide Skyscraper (160x600)

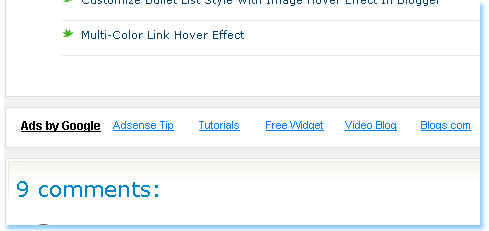
    Location #4:- Addsense Below Posts

     adsense-below-posts

    We gave this area the least importance firstly because the bottom of post is only reached when a reader really enjoys reading your article. Most often readers are in a surfing mood so they would not notice the footer at all. But still we can’t underestimate this area and can expect to get good relevant clicks by displaying the correct ad format as mentioned below.

    Best Ad Formats:-
    • Banner (468 x 60) or
    • (468x15) Displays up to 5 links

    A word of Advice

    Flow of Income from Adsense Requires patience and immense hard work. Give at least up to 1-2 years for income to flow positively. Give more importance to your blog interface and to your content. A good blog content with unfair user interface is equal to an unsuccessful one. Write quality and unique posts. Buy a custom domain and work harder and harder. Don’t try short cuts by making fraud clicks because one can never beat the extra efficient engineers of adsense. If your adsense account is banned for some reasons, your entire blogging career will end in frustration. Think again!
    Patience and hard work brings fruitful results.
    I wish you have a nice blogging experience by monetizing your blog wisely and smartly. Take care :>>

    Importance Of Post Title Limit In The Eyes Of Search Engines

    If the content of any blog is King then it would not be wrong to say that the Title is Queen. Post titles play vital role in search engine optimization. Each Post that you write has a title and this title is responsible for bringing Traffic to that selected Post Page. Now how do you write a keyword rich and full length title that may take you high on search engine rankings?
    Google and Yahoo are indeed the two Mega Search Engines that dominate all others. But for Bloggers Google has more value then Yahoo and we usually receive more Traffic from Google than Yahoo. But We can’t even ignore Yahoo.

    Both Google and Yahoo have different limits for Post titles. Google Displays only the first 66 Characters of any title while Yahoo displays the first 120 Characters.

    For Example :

    • The following title has 85 characters including spaces,
    12 useful Useful Tips and Tricks To reduce The Load Time Of Your Blogger Hosted Blogs

    • Google Will display it like this,
    12 useful Useful Tips and Tricks To reduce The Load Time Of Your……

    • Yahoo will display it like this,
    12 useful Useful Tips and Tricks To reduce The Load Time Of Your Blogger Hosted Blogs

    You can see the difference that Google has cropped the title and displays only the first 66 Characters while Yahoo displays the full title. Of course an incomplete or cropped title will not be much attractive to the visitors compared to a fully displayed title.

    Optimized Title Good in Both Google and Yahoo

    The best strategy is to create a long title consisting of at most 120 characters in order to make sure that the title looks good for both Google and Yahoo. The optimal title should be thought of as consisting of a primary title (for Google) and a secondary title (for Yahoo!). The primary title should consist of no more than 66 characters and your secondary title can be any length up to the point where the full title reaches 120 characters in length. Now lets see an optimized title below,
    Absolute-Title

    Now visitors will be able to see the red portion in Google and the Full title (Primary + Secondary) in Yahoo. You will now receive impressive flow of Traffic from both Google and Yahoo. Now that is like killing two birds with one stone!

    Tip:- Use Only those Words in your titles that describe the entire content of your post. Such words are called keywords.

    How To Solve Google Sitemap Feed Proxy Errors – One Tip Solution

    Google sitemap errors You all know how to submit your blog sitemap to Google if not you can Google for it and can find 1000 tutorials on this single topic but something that most of you might have observed are the Google Sitemap Errors! How do you solve them? Why so many errors when you have done everything the right way? The answer is simple , read on.
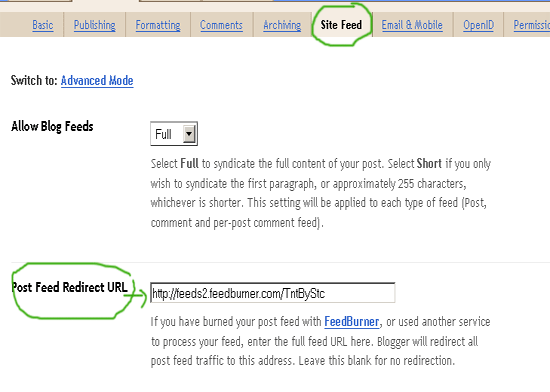
    What actually happens is the fact that most bloggers burn their feeds at feedburner despite the default Atom feed system provided by Blogger. So most bloggers have redirected their default feeds to feedburner as shown below,


    redirecting-site-feed
    When we submit our RSS or Atom feeds at Google Webmaster Tools Site we are actually submitting the redirected feed hosted by feedburner. The disadvantage of doing so is that when Google Robot crawls your blog it basically indexes the data provided by the default BlogSpot feed system but since you have redirected your default feeds to feedburner, Google robot has to contact two feed systems at a time! first from BlogSpot and then from Feedbuner and thus it turns out into a confusion and results as Feed Proxy Errors which is surely a headache for every newbie blogger. Unfortunately the internet has almost rare tutorials on this issue. The reason behind doing a professional SEO course was indeed learning how to solve all such problems. Luckily I have come up with a solution.
    • The mistake everyone makes is by adding the following sitemap data,
    http://YOURBLOGNAME.blogspot.com/rss.xml
    OR
     http://YOURBLOGNAME.blogspot.com/atom.xml
    • But this results in dozens of feed proxy errors. To solve this issue simply submit the following sitemap data,
    http://YOURBLOGNAME.blogspot.com/feeds/posts/default?redirect=false

    Note:- You only need to add feeds/posts/default?redirect=false  because your blog URL will be added by default where , feeds/posts/default?redirect=false is the code that redirects Google only to the default BlogSpot Atom Feed system.

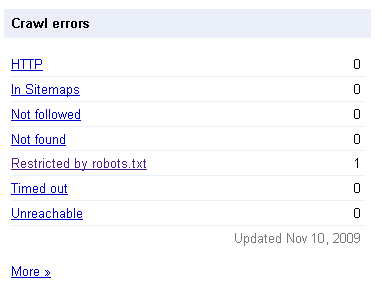
    Finally the results for your blog will look like that for mine

    no-errors
    fully-indexed

    Impressive isn’t it! Adopt the right method and you will see a positive change too. Search Engine do really count for 75% of the traffic to your blog so make sure you smoothen the path for them by optimizing your sitemap as guided in today’s post.

    Free Hot linking For Your files

    HOTLINKING
    To write a good post, you will need to post images, audios, videos, flash files, JavaScript files etc. This can only be achieved if you setup an account with a free file hosting service. If you have ever used Google page creator, you will easily understand what I mean by hot linking. Just the way you upload your files at GPC and get unique URLS for your files, you do exactly the same at a free file hosting service which offers hot linking. 

    What is Hot Linking ?

    Hot linking means, directly embedding or linking to a resource on another server, such as an image or video, so that it appears to be part of the linking website. When you get an HTML code from an image hosting site or video hosting site and you paste it on your posts, the image or video appears instead of that code. This is called embedding. To embed an image, flash file, video etc. you must get separate URLs for your files and getting these unique URLs in other words is called hot linking.

    Where to Upload these Files to get Hot Linking ?

    There are many free file hosting services like:

    Google Sites

    You can host your files at Google sites by simply setting up an account plus you can create your own personal website using site.Google.com. Unfortunately the storage capacity is as little as 100MB. But Google Sites dominate all other services when it comes to upload and downloading speed.  I just love it and rate it 10 out of 10 for keeping your files safe forever.


    Important: Google Sites do not allow upload of JavaScript Files.

    Sigmirror

    Sigmirror  is a good website but I would recommend it only if you don’t want to sign up for an account and have your image files hosted for free. Moreover many JavaScript files that are uploaded here work just fine. Below are some of its features You receive :
    • 5GB of space
    • Max file size 10mb
    • 7GB of Daily bandwidth!
    • Hotlinking allowed on all files (no more download timers!)
    • No Image Watermarks
    • Many file formats permitted
    • Illegal/Pornographic content not allowed
    Important: I wont guarantee its security. Your files can not be 100% secured!


    Boxstr

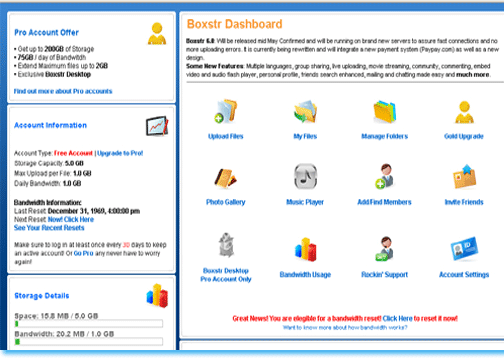
    Boxstr is a good website with a user friendly interface and some unique features like a User Dashboard.
    Some of its features are,
    • Storage Capacity: 5.0 GB
    • Max Upload per File: 1.0 GB
    • Daily Bandwidth: 1.0 GB
    You can see above that you can upload a file as larger as 1GB!, which no other hosting service offers!
    Here is a screenshot of Boxstr.com dashboard.


    dashboard
    Important: I wont guarantee its security. Your files can not be 100% secured! Your files can get deleted during site maintenance.

    Summary

    • Use Google Sites For Uploading any file other than JavaScript. It is highly Secured. After all it is ran by Google.
    • Use Sigmirror and Boxstr for uploading JavaScript files and other heavy files like movies, songs, games, software etc. It is not a 100% secured site. Sometimes during maintenance of these sites all your data gets deleted.

    Important!

    There is another website by the name of HotLinkFiles.  

    hot-linking
    Please do never set up an account with them. They are just frauds with a stupid and highly un-trusted service. I lost 155 files by setting an account with them. I have emailed them several times but I am receiving no reply. I was simply too frustrated the day I lost my precious files. So I repeat do not …do not….do not set up and account and do not be fooled by a fraud website like hotlinkfile.
    Feel free to flush out queries in the comment box below

    Offline Blogging With Windows Live Writer

    Yes! you can blog offline. With growing technology like Windows Live Writer blogging is no more limited to your dashboard. You can write, save and publish posts right from your computer without signing in your blogger account. Blogger HTML editor lacks many features when it comes to writing a good looking post. On contrary windows live writer is a software built by Microsoft Corporation which contains every feature that Blogger lacks.
    I hate blogging without Windows Live Writer! I am sure many bloggers would agree with me on this point.Some of the things you can’t do with Blogger HTML editor are :


    • You can not write HTML code just the way it looks in blogger editor because the code is interpreted as a command and blogger editor converts it to how it may look in a browser.
    • You can’t resize an image to whatever size you like because you are provided with only three options i.e Small, Medium and Large size.
    • The font type and font size is limited.
    • You can not undo what you have done (Going backward).
    • You can’t align images to the left or right of your intro paragraph.
    • You can not add effects to your images, like shadow effect, rounded corners, emboss, blur etc.
    • You can not post an image in its original size
    • You can not insert tables in your posts because no table option exists
    • You can not open a link in a new window unless you edit the HTML
    • You can not add a world map to your posts
    • And much more……………
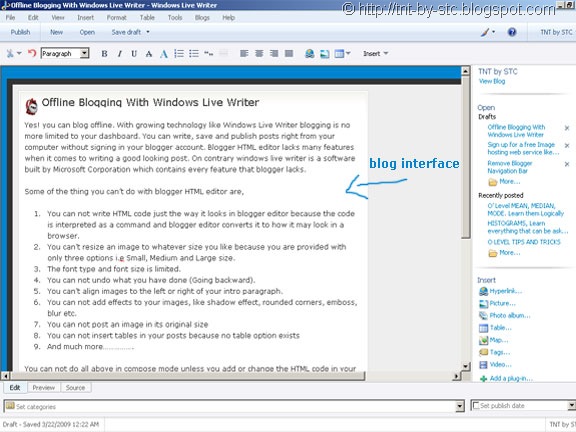
    You can not do all above in a compose mode unless you add or change the HTML code in your HTML editor. But editing HTML would seem difficult for a newbie whilst pretty easy for a professional. Since most people like me have limited knowledge about editing HTML, blogger editor is of little use to all of us. Luckily! Windows Live Writer comes to our rescue. It can to do what ever blogger editor can not. It contains every feature a blogger is looking for. One of the best things I like about it is that it saves a copy of your blog interface/theme and when you write posts, it will be just like writing a post straight into your blog. See the image below to understand what I mean to say,

    windows live writer interface
     

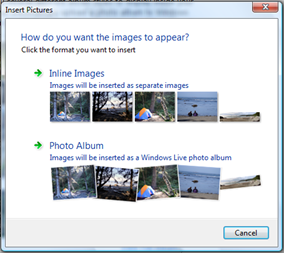
    Moreover your images can be displayed in two different ways look below,

    image thumbnail in windows live writer 

    Selecting the photo album option will display your images in a scattered style (with a view album link below your scattered images),

    Scattered album with windows live writer 
     

    So go and download it right now by clicking the link below.

    DOWNLOAD WINDOWS LIVE WRITER NOW!

    Troubleshot

    If you get an error saying that “your windows installer is out dated” then run the following setup (below) before windows live setup (above)

    Download Latest Windows Installer Here !
    Enjoy Blogging with better comfort from now onwards! Get in love with it  in-love

    Twitter Delicious Facebook Digg Stumbleupon Favorites More


    Recent Posts

    Join Me On Facebook

    700+ Followers

    Followers


    meet women in Ukraine contatore visite website counter
    DMCA.com

    Recent Comments

    Follow Me On Twitter

    1112+ Followers